Although the Tokyo Summer Olympics has come to an end the return of live events continues. According to the latest survey made by UTA IQ, almost all consumers surveyed plan to return to some form of live entertainment once it’s safe with sporting events, concerts and movie theaters topping the list.
Besides the lucky audiences that get to attend the live events in person, most of us will be watching via phone/TV/PC. This is when videographers will need Hollyland Streamix M1 to live stream the show with up to 6 video sources and give the audiences a spectacular immersive experience.
The Streamix M1 is a powerful video switcher that supports multi-platform streaming, wired/wireless connection, IP camera control & streaming and built-in video effect features, etc. It enables content creators to select the best angle video to entertain the viewers wherever the hosts and guests are.
In this article, we will introduce 3 application scenarios of streaming with the Streamix M1 video switcher.
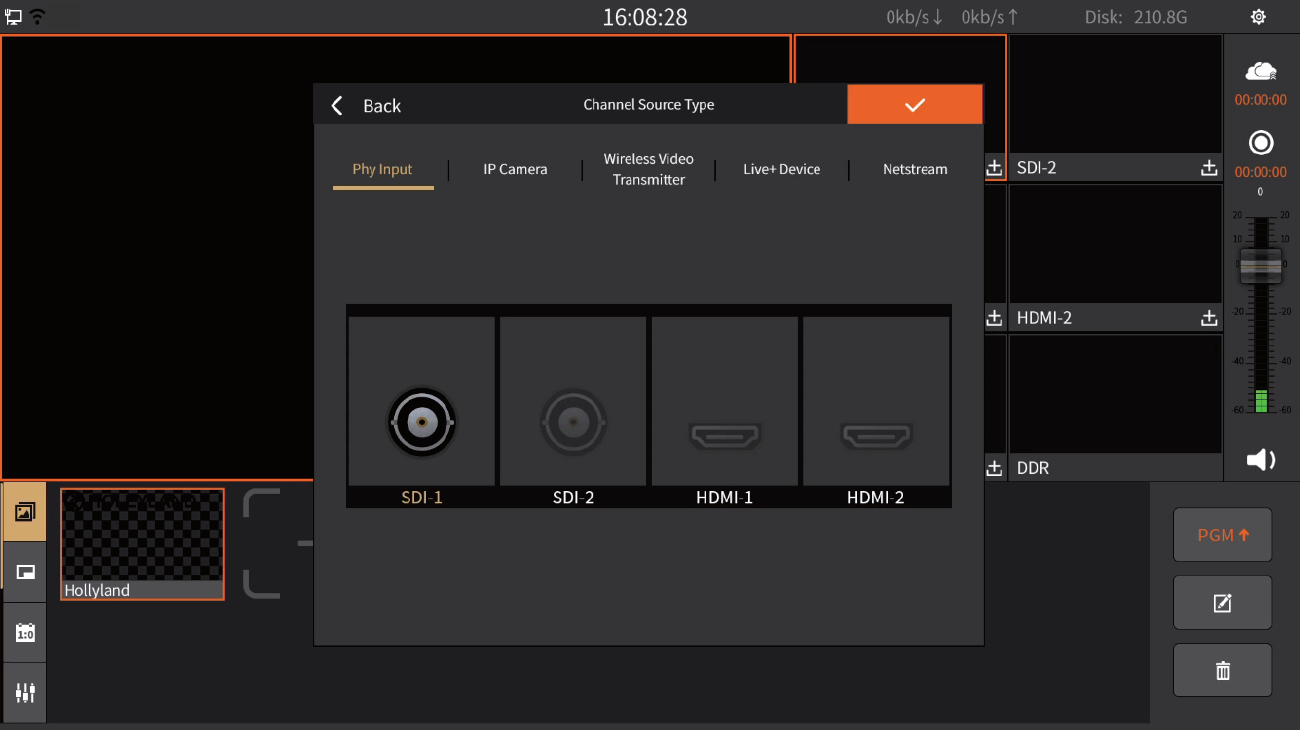
Before we get started, let’s get familiar with the software interface of Streamix M1.
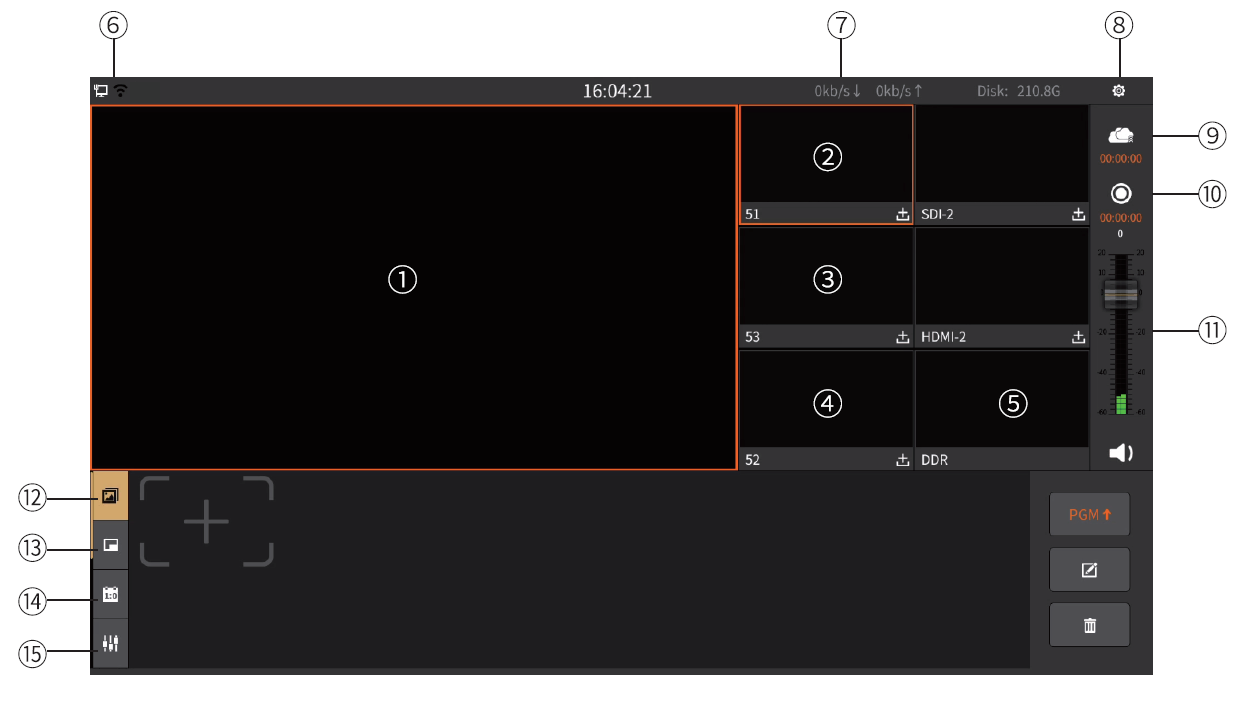
1. Main monitor
2. Channel for SDI input/IP camera input/video transmission system input
3. Channel for HDMI input/IP camera input/video transmission system input
4. NET input channel
5. DDR display channel
6. Network status display
7. Upload/download speed
8. Settings
9. Streaming control
10. Recording control
11. Output volume control
Live Streaming Interface
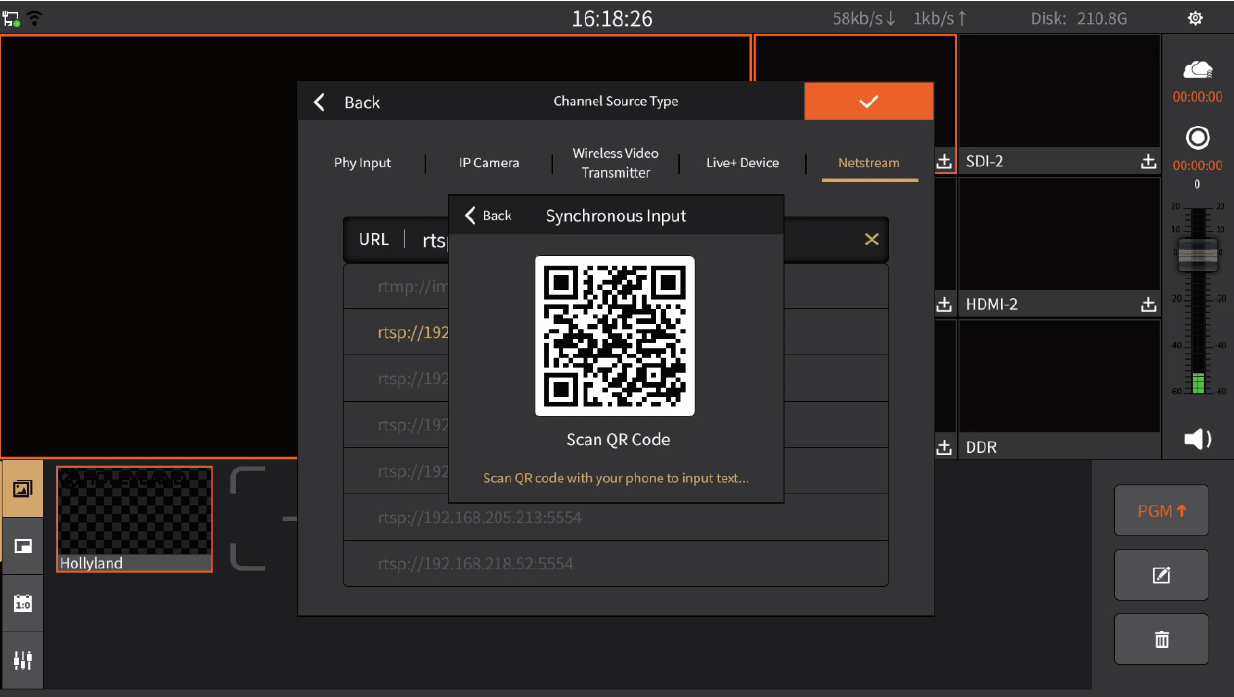
Tap the text box and enter the text. Click the QR code icon of the virtual keyboard to enable same-screen input function.
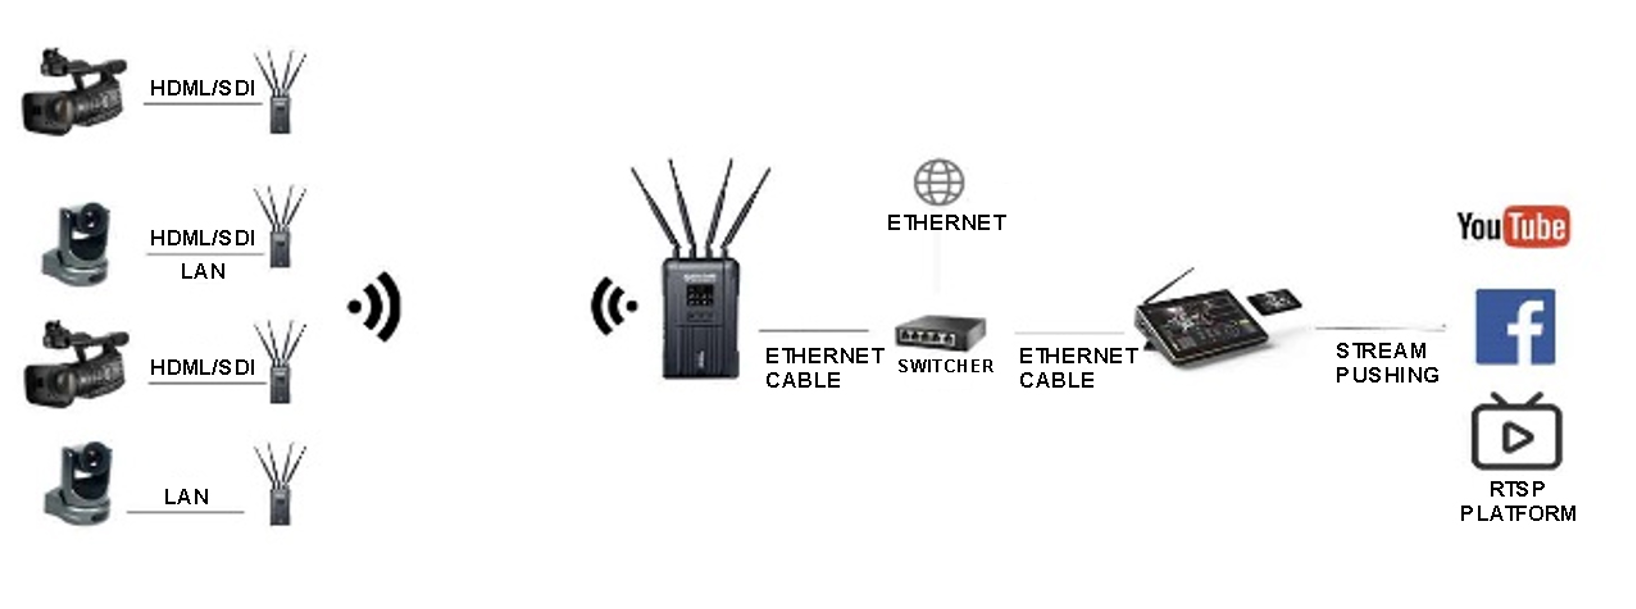
Live Streaming System Topology
Steps of live streaming with Streamix M1
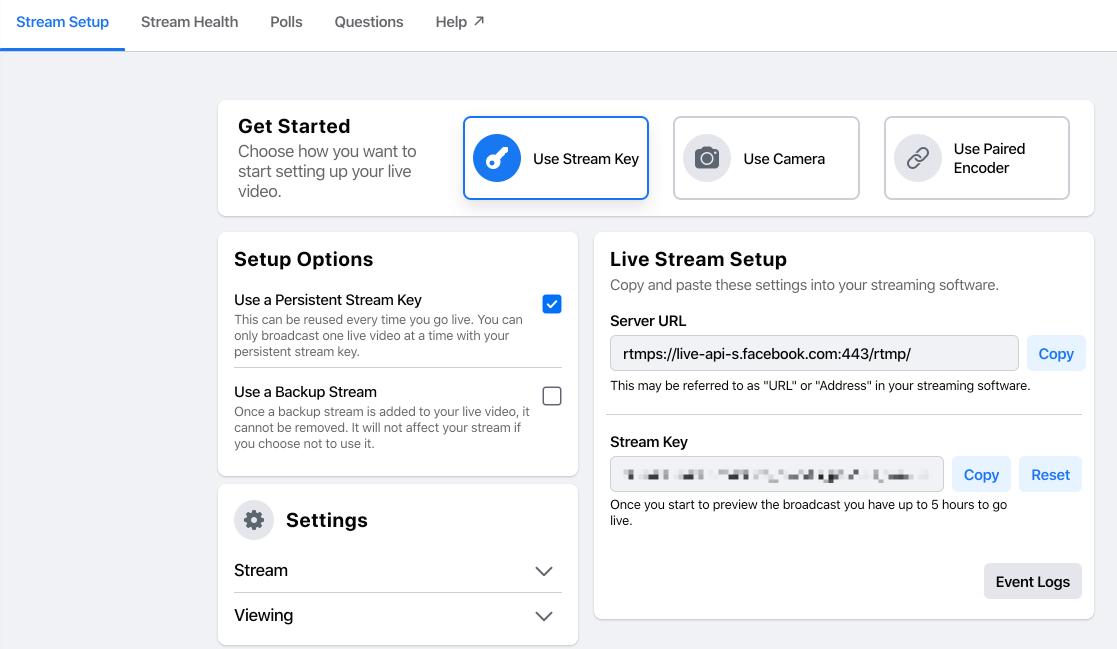
1. Link generation: Generate a live streaming link on Facebook or other RTMP-supported platforms (stream URL and key are needed).
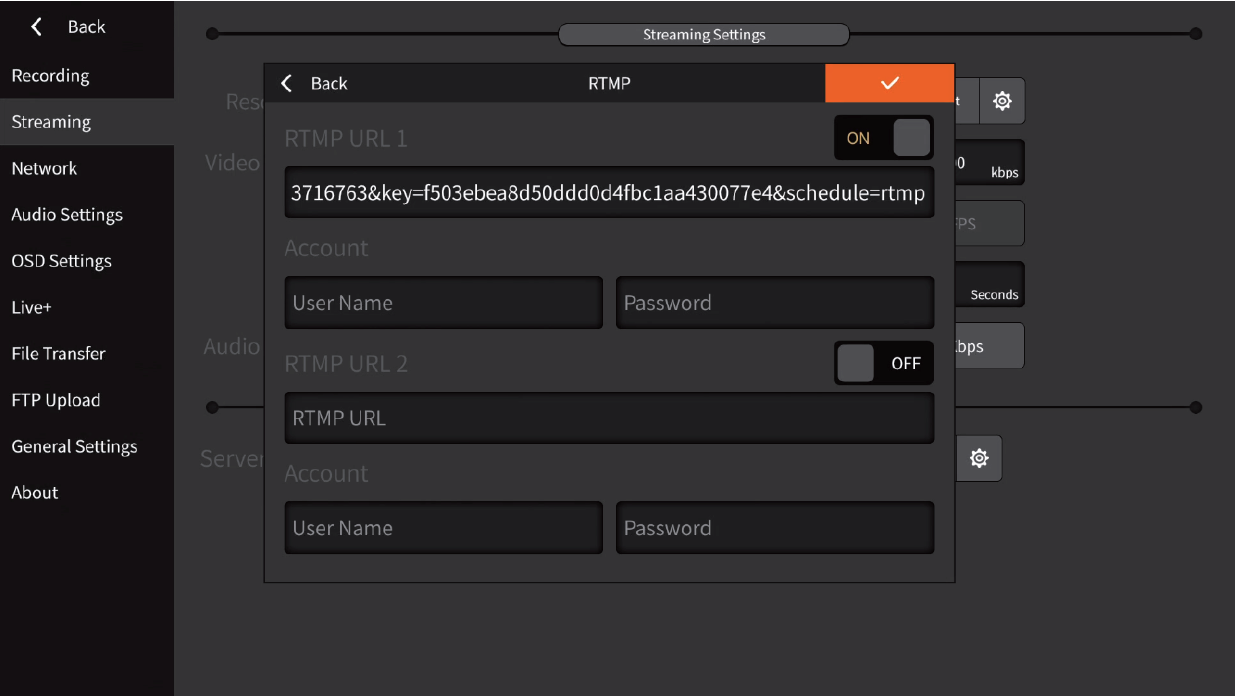
2. Click Settings on the top right corner of the interface and select Streaming on the left-side menu. Select the corresponding live stream platform and enter the required information.
*It is recommended to enter the stream URL using the same-screen input function: after the virtual keyboard pops up, tap the QR code icon and scan the QR code with phone QR code scanner. Open the link on your phone browser and copy and paste the link to the Streamix app.

3. After connecting the Streamix M1 with the selected platform, please return to the main screen and tap the video stream button on the top right corner to enable live streaming.
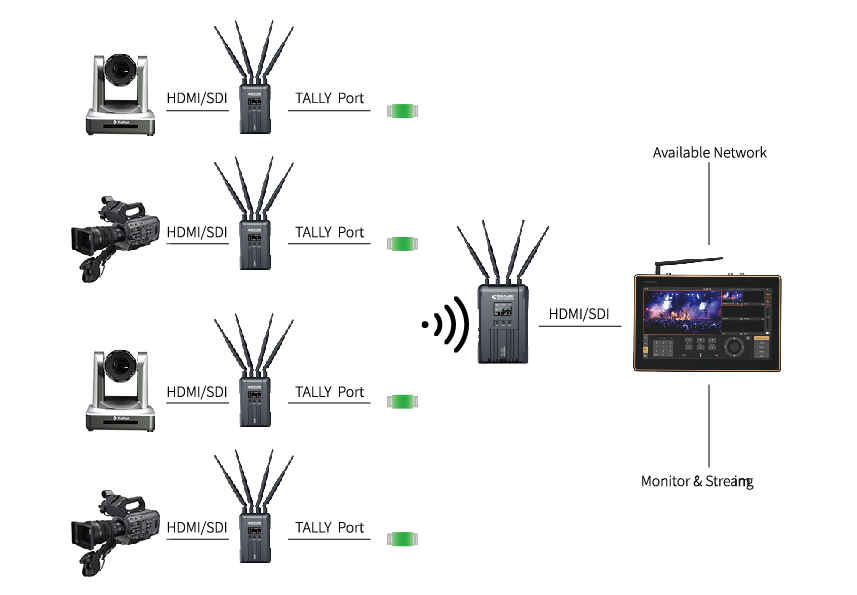
Application Scenario 1:
Equipment involved: Streamix M1 video switcher, Syscom 421 wireless video/audio transmission system, cameras (for video output and input).
1. Turn on the transmitters and the receiver of Syscom 421, which will auto connect once turned on and show frequency info on screen (if the devices are not connected users will need to press and hold the middle button of transmitters and receiver for 3 seconds to enter the main menu. Then, select device pairing in System Setting.).
2. Video streaming resolution of the transmitter is the same as that of the camera if the transmitter and camera are connected with HDMI/SDI cable.
3. Once the receiver is connected to the Streamix M1 via HDMI1/HDMI2/SDI1/SDI2 port with HDMI/SDI cable, video streams of the camera will be shown on the corresponding preview window on the right side. Tap the specific preview window to shift the video streams to the main monitor.
4. Connecting the camera and Streamix M1 via the HDMI-OUT and SDI-OUT ports, the video streams will be directly shown on the main monitor and can be projected to an external screen for convenient viewing of the audiences.
5. After connecting the video switcher to Wi-Fi, there will be green dots shown on the left side of the screen to indicate that internet access is available.
6. Click the Streaming Control button to stream the content on the main monitor to the corresponding platform.
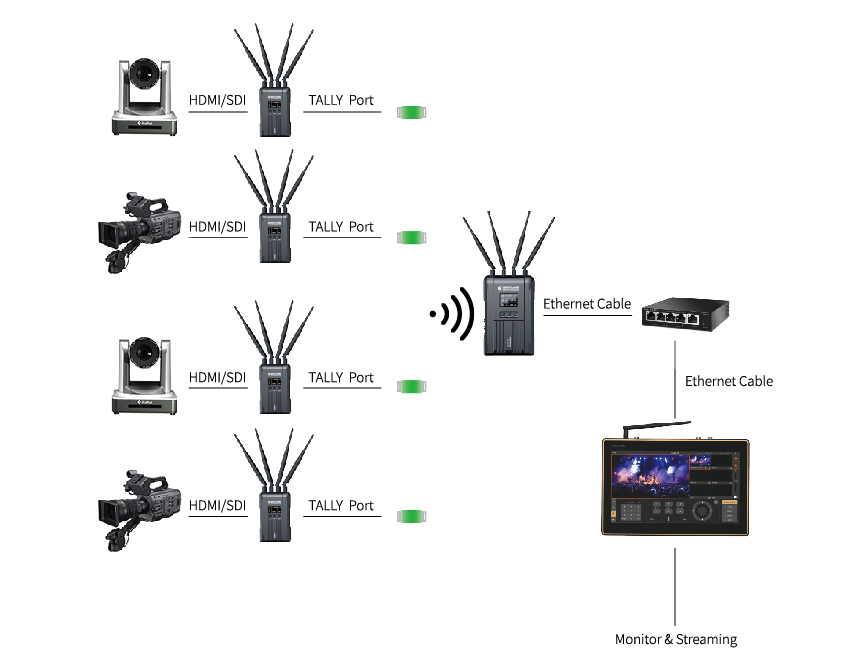
Application Scenario 2:
Equipment involved: Streamix M1 video switcher, Syscom 421 wireless video/audio transmission system, IP cameras (for video streaming via TX/HDMI/RX port).
1. Turn on the transmitters and the receiver of Syscom 421, which will auto connect once turned on and show frequency info on screen (if the devices are not connected users will need to press and hold the middle button of transmitters and receiver for 3 seconds to enter the main menu. Then, select device pairing in System Setting.).
2. Connect the transmitters and cameras with HDMI/SDI cable. Then, connect the Streamix M1, receiver and POE switcher with network cables (Streamix M1 can be directly connected to the receiver. The use of the POE switcher is to realize both streaming and online streaming.).
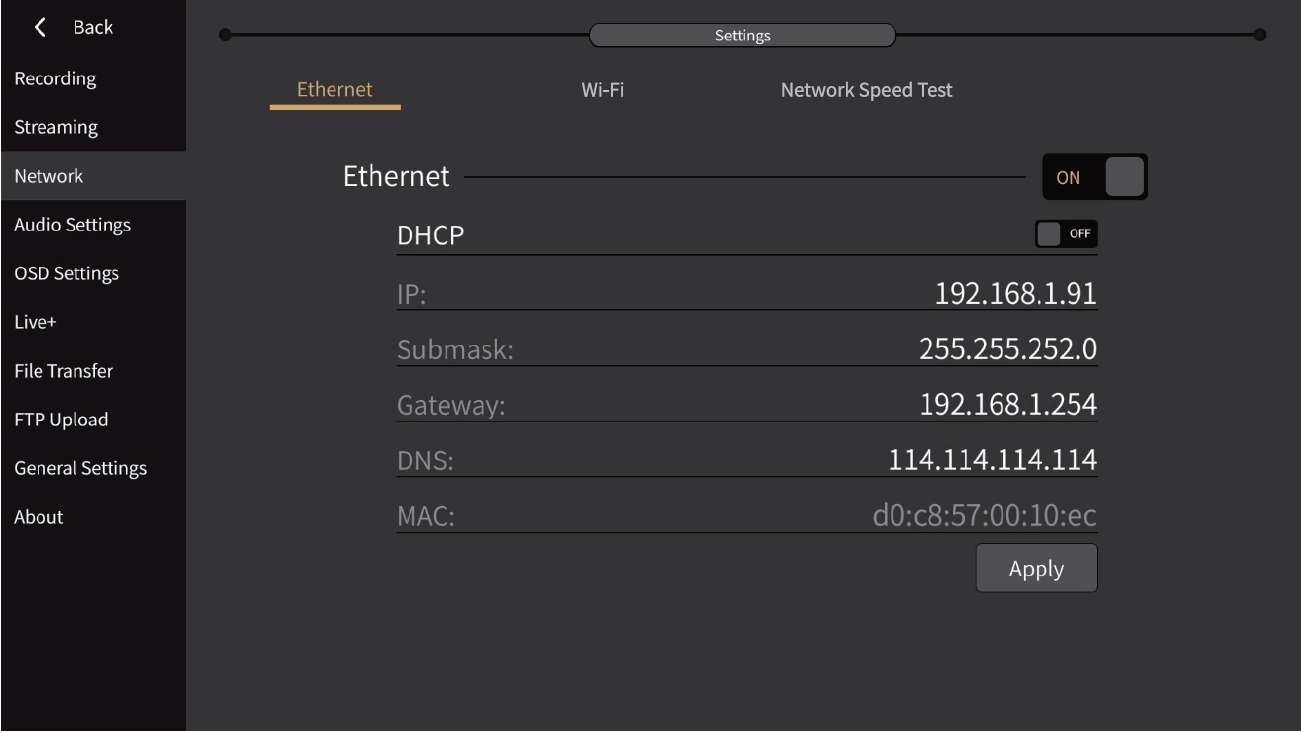
2.1. Set the network setting to DHCP mode

2.2. Add additional video sources by tap the preview windows on the right side of the main screen.
2.3. Select Wireless Video Transmitter on the pop-up window and tap the Refresh button. Then, select transmitters that are connected to corresponding cameras to add a video source to the main screen. Click the tick icon on the top right corner to start streaming.
2.4. Click the Streaming Control button to stream the content on the main monitor to the corresponding platform.
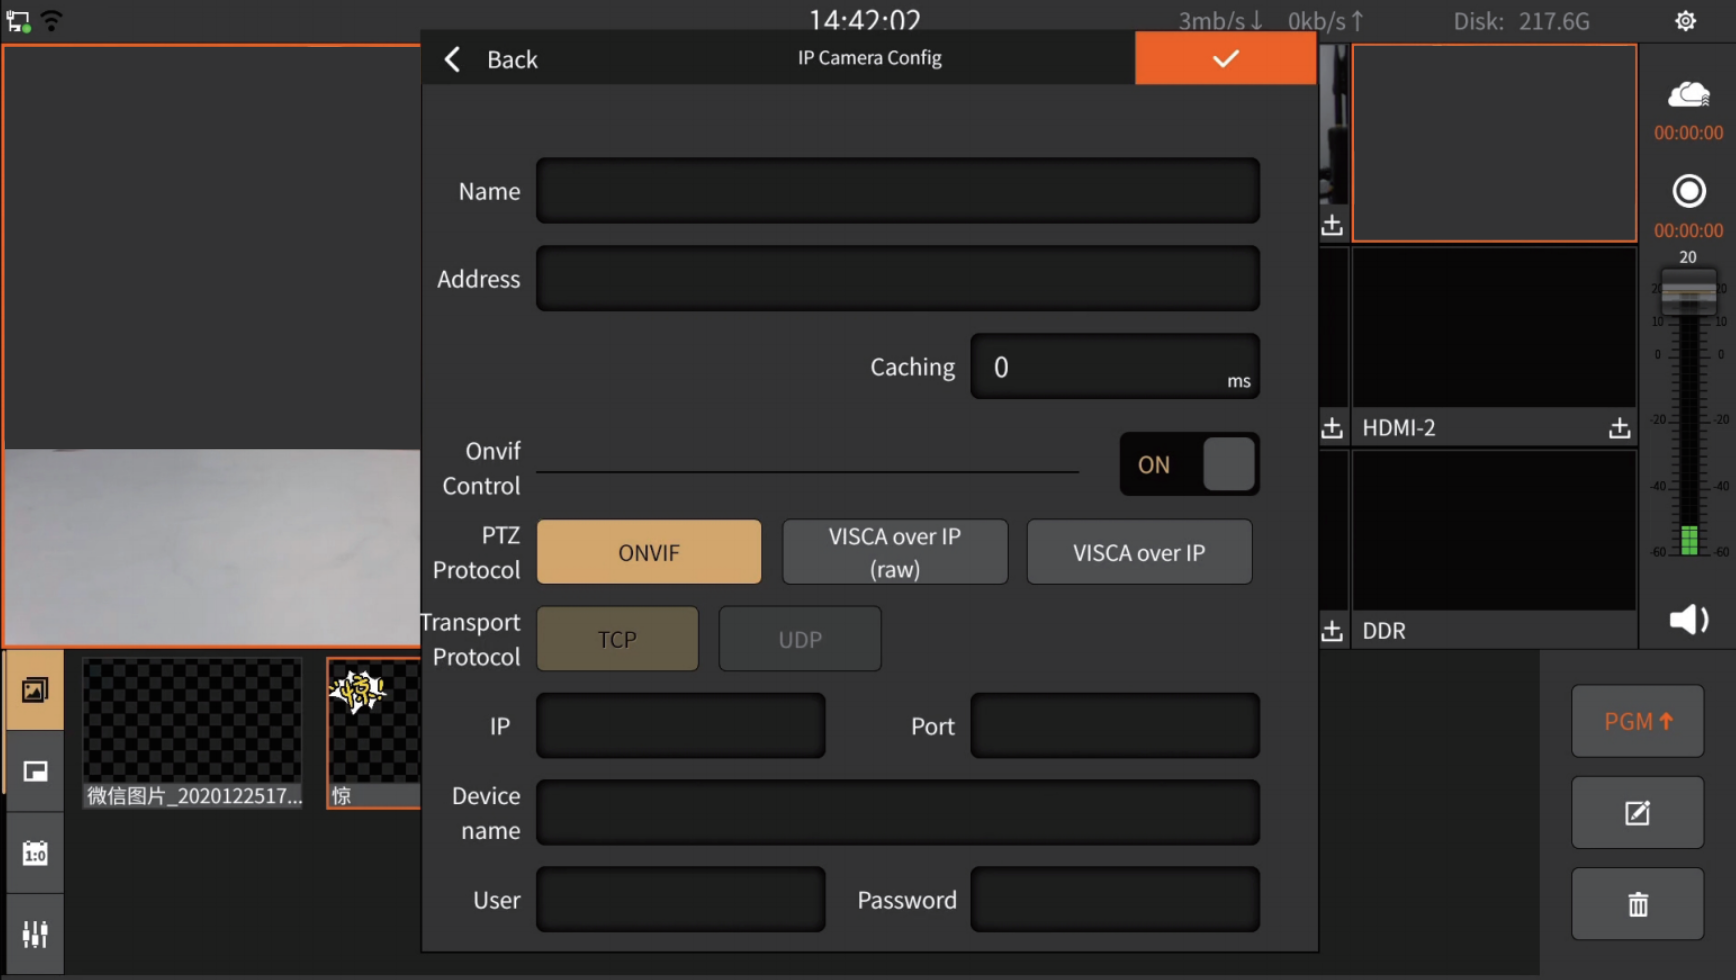
3. The Streamix M1 can control the IP cameras with network cables. If the IP cameras connected to the transmitters support VISCA/RS422/485 protocol the Streamix M1 can be connected to the cameras and transmitters with network cable/RS422/RS485 cable:
Select the corresponding video source and click Setting. Then, select the corresponding VISCA protocol and UDP protocol.
Enter the corresponding IP address and port number of the IP cameras to control the camera’s direction, focus, zoom, aperture and preset position.
Application Scenario 3:
Equipment involved: Streamix M1 video switcher, Syscom 421 wireless video/audio transmission system, IP cameras (for video streaming via TX/HDMI/RX port).

1. Turn on the transmitters and the receiver of Syscom 421, which will auto connect once turned on and show frequency info on screen (if the devices are not connected users will need to press and hold the middle button of transmitters and receiver for 3 seconds to enter the main menu. Then, select device pairing in System Setting.).
2. Connect the transmitters and IP cameras with standard network cable. Next, connect the Streamix M1, receiver and POE switcher with network cables (Streamix M1 can be directly connected to the receiver. The use of the POE switcher is to realize both streaming and online streaming.).
2.1. Set the network setting to DHCP mode
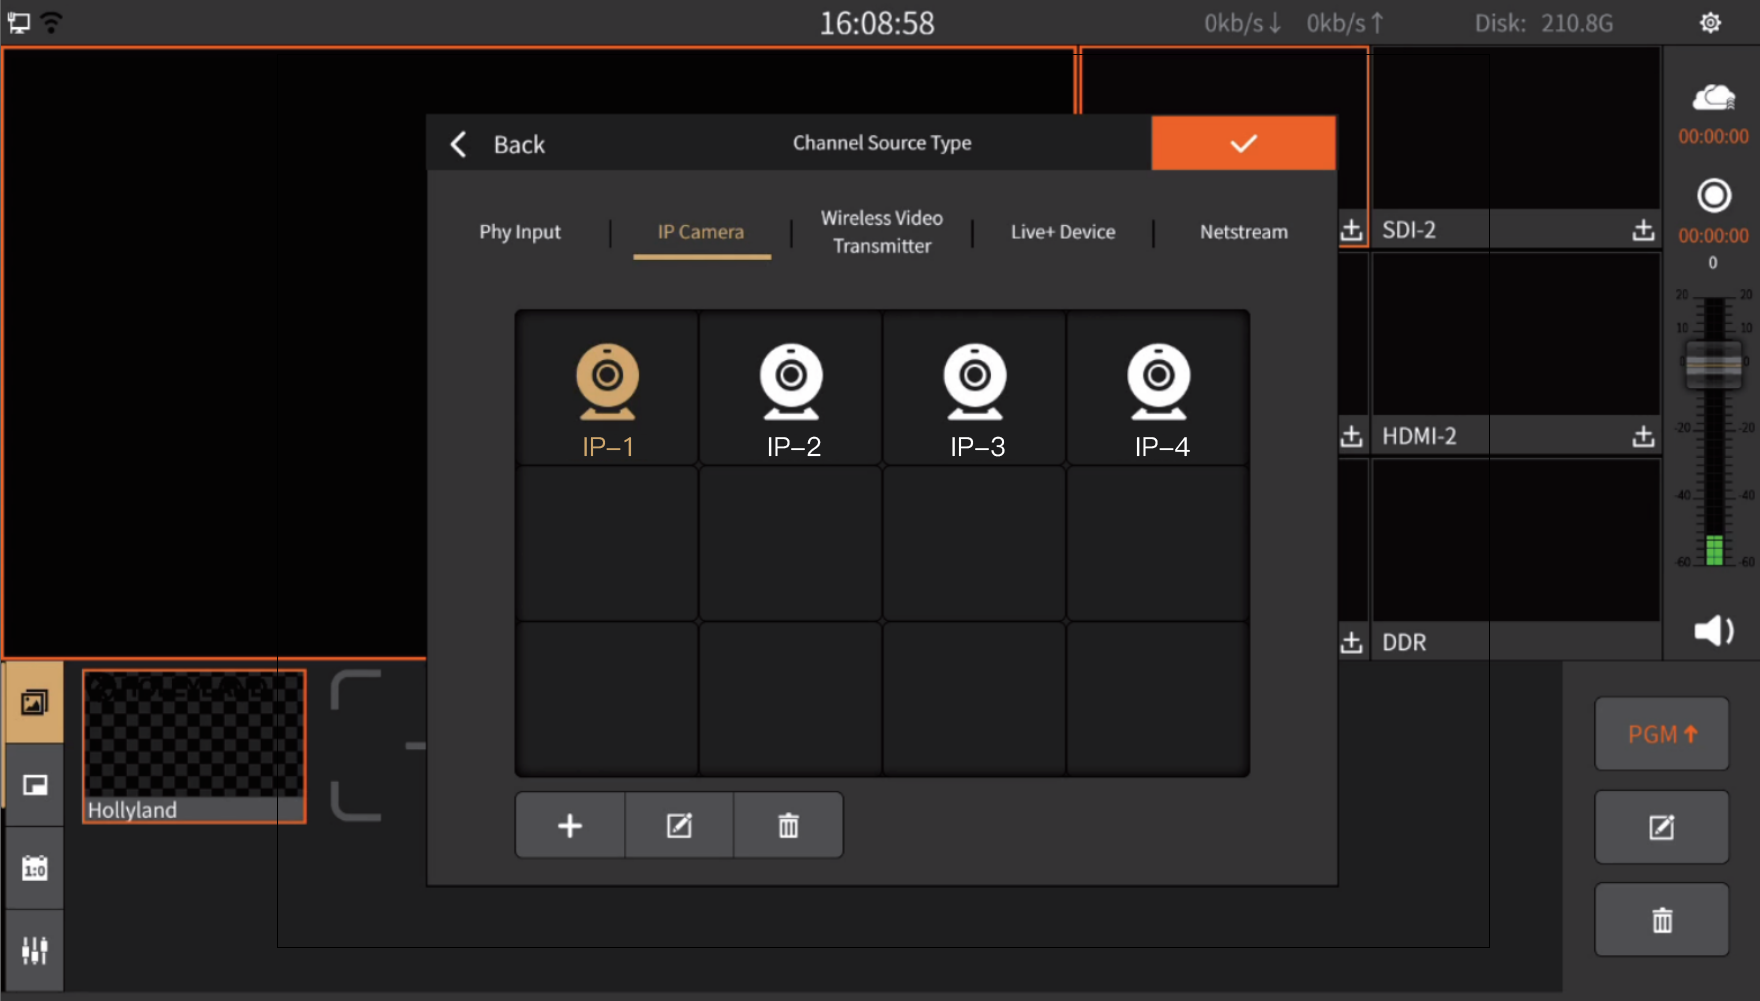
2.2. Add additional video sources by tapping the preview windows on the right side of the main screen.
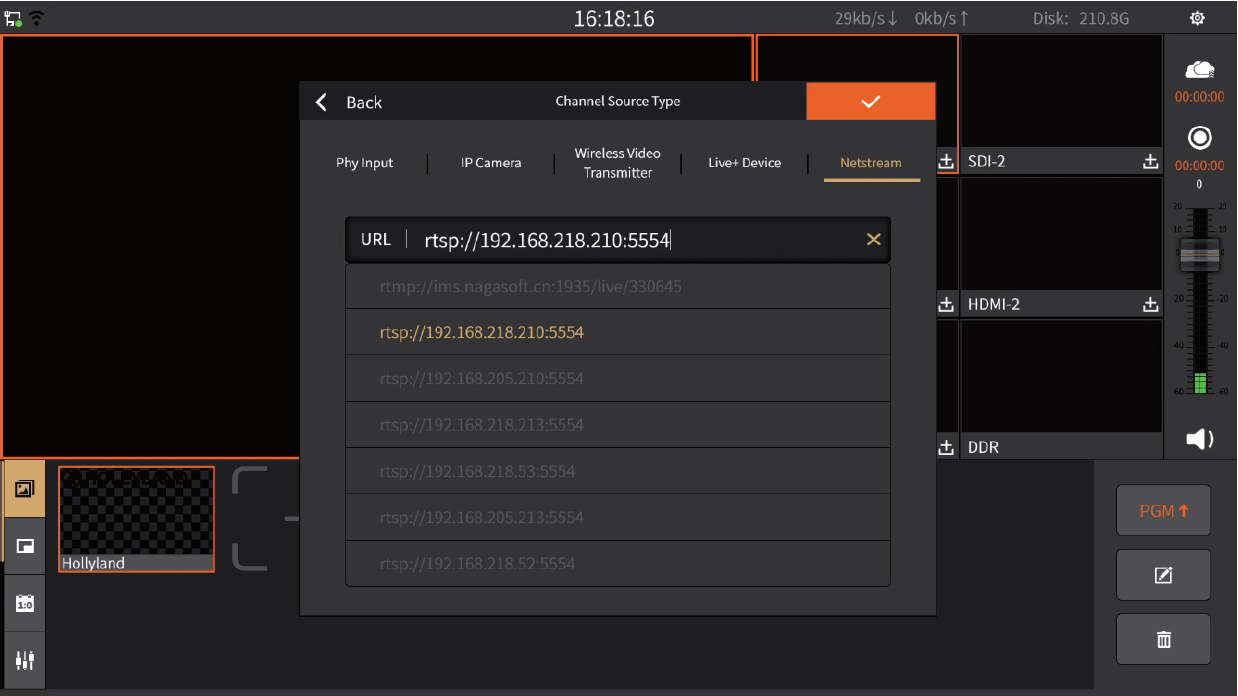
2.3. Select IP Camera on the pop-up window and tap the Edit button. Then, fill in the boxes with the corresponding RTSP address and select IP camera control protocol. Click the tick icon on the top right corner to start streaming.
2.4. Click the Streaming Control button to stream the content on the main monitor to the corresponding platform.
Live switcher is one of the necessities in creating a wonderful live event. Together with Syscom 421 video/audio transmission system, Streamix M1 provides exceptional video switching experience for your projects from small in-studio production to large outdoor events. If you want the most advanced live switching solution in this size and price category, Streamix M1 is an unbeatable choice.